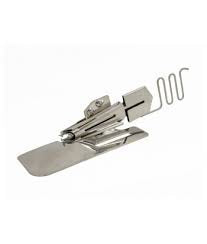
This quilt binder attachment is perfect for attaching binding to your quilt projects. The quilt binder has a large opening to accommodate the quilt layers and creates a finished binding size of ½”. The quilt binder attachment comes with a dedicated presser foot for use with IDT to ensure even feeding through the binder and a perfect result.
J* Must be fitted with a compatible Needle Plate - 412964309 (available separately).
The Double Fold ½“ (12mm) binder will turn a light weight woven fabric strip into a binding and attach it to the project edges all in one step.
To bind edges with the ½“ (12mm) Quilt Binder, cut a 1¾“ (45mm) wide strip of light weight woven fabric.
-
Attach the Quilt Foot with guide.
-
Set the machine for straight stitch or hand look quilt stitch.
-
Place the attachment plate on the stitch plate of the machine. Align pin on the back of attachment plate to the top opening on the stitch plate of the machine. Screw the attachment plate in place with one thumb screw.
-
Place the binder on the attachment plate and adjust the binder to line up. Attach the binder in place with the two thumb screws and washers.
-
Measure the length of your project and add at least 6” (15cm).
-
Cut enough 1¾” (45mm) strips to equal that number and join the strips together. Cut the end of the strip into a point.
-
Slide the fabric strip into the binder with the wrong side facing you using tweezers.
-
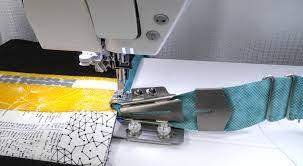
When the fabric is through the end of the binder, hold the folded strip with y our left hand and continue to feed it into the binder as shown while the fabric forms a double fold tape.
-
Raise the presser foot and pull the strip under the foot and straight back 2.5” (5-6cm) behind the needle.
-
Slide the fabric to be bound right side up into the slot of the binder. Adjust the stitch position to right or left to reach the desired needle position.
How to sew a quilt binder corner:
Sew to the edge of the quilt, tie off and then pull the quilt out from binder. Keep the quilt close to the binder when folding the corners. Finger press the folded fabric.
Create a mitered corner:
-
Fold and pinch the top mitered corner, pin in place with a long pin. Repeat in the same way on the back of the quilt.
-
To continue sewing the binding, pull the fabric strip back through the binder and at the same time place the quilt back under the presser foot and into the binder again.
-
To insure that the fold is right on both top and back, pull the quilt forward and back again a couple of times.
-
Lower the needle to hold the binding in place and remove the needles. Pull out long thread tails behind the presser foot before start to sew. Backstitch and sew the binder in place. Repeat on the other corners.
How to end the binding:
-
Sew the binding all the way around the quilt edges. When the edges off the binding almost meet, cut the excess of fabric in the beginning of binding as illustration.
-
Continue to sew, overlapping the binding one more time. Remove the quilt from the binder and trim excess leaving 1” (2.5) cm tail. Fold back the opening and pin in place. Sew a seam over the folded edge.